

All you need to know about the Screen of Green
Welcome to our ScrOG Tutorial! In this article we are going to go in depth on what SCROG is all about, from what you need to do one, to the advantages, passing by a detailed how to guide and much more.
What is SCROG or the Screen Of Green ?
SCROG is an acronym for Screen of Green. This technique of cultivating your Marijuana allowing you to have multiple Apex’s on your plant.
Basically the idea is to have your plant follow a screen, giving the branches that grow direct access to the light source.
With more access to light your branches will be able to produce more energy, giving you some nice big buds!
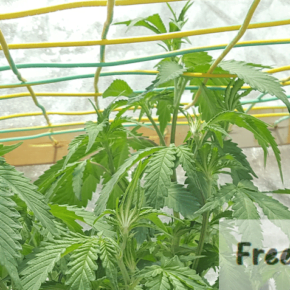
Look at the image on the right, you can see new branches starting to sprout up on the screen.
Those little branches will be full grown flowers soon enough.
Personally SCROG is one of my favorites, it takes longer to produce but once you get the hang of it you save a lot of time.
Before getting the “How to” section of the page, lets go over the pro’s and con’s of scrogging.

What are the pro’s and con’s of SCROG?
The pro’s:
In terms of equipment you don’t really need much, all you need is:
There are multiple steps to setting up your scrog and it really starts at the sprouting stage, so make your decision early on!
Let’s cover the steps on how to scrog
How to set up your SCROG in 5 easy steps
1. Attaching your screen
So what you want to do here is get your screen at about 40/50cm (15/20 inches) of the top of you’re pot, and attach it by the four corners of your grow room. I use metallic string for this (cf image), attached on the 4 corners of the room.
As a safety I also add 3 strings, attached from the top of each side of the room onto the sides of the screen, just in case something happens. Once those branches start invading the screen you don’t want it to get moving.

2. Pruning your leaves and branches
Once your branches start to reach the screen, it is important for you to cut some of those leaves and branches, here’s an easy way to choose:


I know it will hurt and you will be hesitant, but really don’t be, cut everything that isn’t going to produce energy, that take’s the space of another or produces shade over an area.
Your plant will thank you by growing much faster on the top of the screen, where everything has direct contact with the source of light.
3. Guiding your branches horizontally on the screen
Now it’s time to get your plant to fill up the screen. You’re going to want to take your main branches and chose which direction they’re going to go in.
Follow these steps:


4. When to start the flowering stage
You want to start the flowering stage once your screen is filled up. Now remember the first 2 weeks is the stretch, and as we’ve seen in our FAQ covering the differences between sativa and indica weeds, the amount of growth during the stretch depends on the strain.
With Sativa’s you can keep on weaving during the first days, some even week, of the stretch, indica’s it’s best to have finished before launching.
Here’s a couple pictures ouf our own during the stretch, and a link to the blog post about the start of the SCROG


Don’t feel like reading? I Love Growing Marijuana put together a pretty neat video explaining the different steps to scrogging, check it out:
Can I SCROG with any seed?
Technically yes, although it is though with auto-flowering seeds since you can’t control the length of the vegetative stage.
My advice would be to take pre feminized seeds of the strain of your choosing.
Can I SCROG with any strain?
Yes! it is totally possible to scrog with indica or sativa weeds. Although you will adapt a little, the indica strain growing less during the stretch, your vegetative stage will have to be longer.
On the other hand, with sativa weeds you can switch to 12/12 earlier and keep weaving a little while during the stretch phase.
[original article from Free The Tree ]
Welcome to our ScrOG Tutorial! In this article we are going to go in depth on what SCROG is all about, from what you need to do one, to the advantages, passing by a detailed how to guide and much more.
What is SCROG or the Screen Of Green ?
SCROG is an acronym for Screen of Green. This technique of cultivating your Marijuana allowing you to have multiple Apex’s on your plant.
Basically the idea is to have your plant follow a screen, giving the branches that grow direct access to the light source.
With more access to light your branches will be able to produce more energy, giving you some nice big buds!
Look at the image on the right, you can see new branches starting to sprout up on the screen.
Those little branches will be full grown flowers soon enough.
Personally SCROG is one of my favorites, it takes longer to produce but once you get the hang of it you save a lot of time.
Before getting the “How to” section of the page, lets go over the pro’s and con’s of scrogging.
What are the pro’s and con’s of SCROG?
The pro’s:
- Higher render of buds per plant
- Less plants to take care of
- Reduced time to water the plants
- You get some MASSIVE plants
- Maximising your yield per plant
- Longer vegetative stage
- More nutrients per plants are needed
- Guiding and clipping branches is time consuming
- Danger of breaking the branch when weaving the plants if you’re not careful
In terms of equipment you don’t really need much, all you need is:
- A screen: Try and have square spacings of about 10cm wide. You can either make it yourself of buy one at a gardening store
- Large buckets: In order to scrog your plant will need to have a strong root ecosystem during its flowering phase, so don’t hesitate to get her at least in a 10L bucket
- Scissors or a razor: You’re going to need to trim leafs and branches pretty often, to do so a pair of scissors or a razor is best.
- Clips and/or string: In order to guide your plant you’re going to need to guide the branches on the netting.
To do so I find string to be just perfect, not too aggressive for the plant, flexible and allows you to pull it in the direction you want.
There are multiple steps to setting up your scrog and it really starts at the sprouting stage, so make your decision early on!
Let’s cover the steps on how to scrog
How to set up your SCROG in 5 easy steps
- Attach your screen
- Prune your leaves and branches
- Guiding your branches horizontally on the screen
- When to start flowering
- SCROG and the flowering phase
1. Attaching your screen
So what you want to do here is get your screen at about 40/50cm (15/20 inches) of the top of you’re pot, and attach it by the four corners of your grow room. I use metallic string for this (cf image), attached on the 4 corners of the room.
As a safety I also add 3 strings, attached from the top of each side of the room onto the sides of the screen, just in case something happens. Once those branches start invading the screen you don’t want it to get moving.
2. Pruning your leaves and branches
Once your branches start to reach the screen, it is important for you to cut some of those leaves and branches, here’s an easy way to choose:
- Cut the Leaves: That aren’t receiving light under the screen
- Cut the Branches: That will either take too long to reach the screen or that will cross paths with another branch with more potential.
I know it will hurt and you will be hesitant, but really don’t be, cut everything that isn’t going to produce energy, that take’s the space of another or produces shade over an area.
Your plant will thank you by growing much faster on the top of the screen, where everything has direct contact with the source of light.
3. Guiding your branches horizontally on the screen
Now it’s time to get your plant to fill up the screen. You’re going to want to take your main branches and chose which direction they’re going to go in.
Follow these steps:
- Identify the direction you want each branch to go in. This planning step is important, you want to make sure that each branch has at least one free space to its left, and one to its right
- Bend the top of the branch over the first line and under the next one.
Don’t hesitate to tie down the branch onto the netting so that it holds.
In the first image on the side here you can see how we tied the apex on both nettings in order to pass her under and over the screen. - Cut any leafs making shade to a spot where a branch could come out. You should also cut the branches that are to close to each other. At each not you should have tops 1 branch growing vertically.
- Take a string, on one end tie it around the top of your branch and the other tie it in the direction where you want you plant to go on the screen. Don’t hesitate to pull well on her she can take it.
You can see on the last image of the set how each branch is weaving over and under the screen, as well as the green string pulling them in the direction we want her to go.
4. When to start the flowering stage
You want to start the flowering stage once your screen is filled up. Now remember the first 2 weeks is the stretch, and as we’ve seen in our FAQ covering the differences between sativa and indica weeds, the amount of growth during the stretch depends on the strain.
With Sativa’s you can keep on weaving during the first days, some even week, of the stretch, indica’s it’s best to have finished before launching.
Here’s a couple pictures ouf our own during the stretch, and a link to the blog post about the start of the SCROG
Don’t feel like reading? I Love Growing Marijuana put together a pretty neat video explaining the different steps to scrogging, check it out:
Can I SCROG with any seed?
Technically yes, although it is though with auto-flowering seeds since you can’t control the length of the vegetative stage.
My advice would be to take pre feminized seeds of the strain of your choosing.
Can I SCROG with any strain?
Yes! it is totally possible to scrog with indica or sativa weeds. Although you will adapt a little, the indica strain growing less during the stretch, your vegetative stage will have to be longer.
On the other hand, with sativa weeds you can switch to 12/12 earlier and keep weaving a little while during the stretch phase.
[original article from Free The Tree ]


